Pages

Showing posts with label fabric. Show all posts

Saturday, March 17, 2012

Quick shorts, a tutorial:)


Hi all.  Well my little man is turning 3 soon so I have been working at making him a few things for his birthday.  One thing I have been working on is a bunch of shorts for summer.  These are really for pajama's during those hot summer months.  I was blessed with this lightweight flannel material from my Aunt Mary.  At the time I didn't have a boy, so it's been sitting... but I DO now!! YEAH!  SO, here goes, so quick and easy shorts!  (IMPORTANT NOTE:  originally I made this with a used t-shirt, which is even FAST , maybe takes like 20 minutes, because you can use the bottom hem of the shirt as the leg hems!  LOVE THAT!  Just lay the shirt flat and put the shorts up against the right side fold and then flip them over for the left side fold of the shirt, easy!)

Ok, so fold your fabric and your nicely fitting shorts.  Put both folded sides together.  Cut about an inch extra on the bottom and top for the hems and I cut around 1/4 inch around the side for when you sew the two pieces together.

Hard to see, but my first cut piece is now flipped over to the left and laying on the next folded piece of fabric.  You can use the original shorts here, but this pattern has horizontal lines so I wanted to line it up.  once I lined it up, I cut the excess off the bottom and then just cut out the exact shape of the first piece ( cause it already has it's extra for hem etc..)

Pic to show you that the first cut out piece is now on the top of the next folded over piece to cut.  make sure your folds are together.

now you should halfs two identical folded pieces


unfold these pieces and put right sides together.  Now your gonna pin and sew from the top hem of the waist to the point of the crotch.  Don't sew  the rest of the strait way down yet! ( folded over part is the part you DON'T sew)
IMPORTANT NOTE:  If you are gonna make alot of these shorts, like I did, take one of these pieces and use it as a template for however many more shorts you want to make, it's much easier this way!

Sew front the top corner to the little tip before it goes strait again.


Now put those sewn seams in the middle and lay the shorts out flat, they are starten to look like shorts now!

Pin crotch area like this and then sew from the bottom of one leg to the bottom of the other.


Now fold a hem for your short bottoms.  I did 1/4 inch fold then maybe 1/2 to 3/4 inch fold and then sew all around.

Now fold the waist hem.  I did 1/4 first fold then fold that over about 3/4 inches, depending on the size elastic you have.


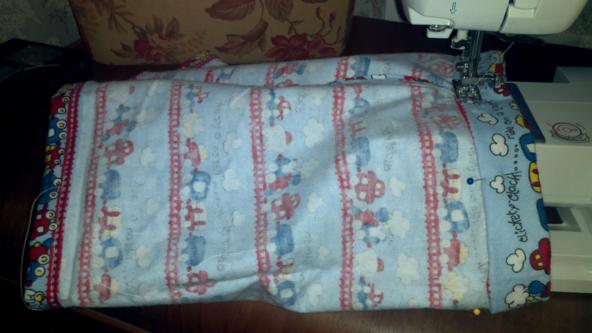
Now sew the hem close to the edge of the fold ALMOST all the way around.  I leave a inch or so opening to thread the elastic.

There is the opening in the back.

Grab some elastic, stick one of those thingys through it and feed it through the hem till you come out the other side.  Make sure you keep the other end from slipping into the hem line:)


Now once you got it through, check it on your kiddo, I believe a rule of thumb is 1 inch less then the measurement of your waist.  Then sew the two ends of elastic together and push them into the hem.

there in there now:)


Sew up the whole all the way across. I also ad a vertical line of sewing on the front or side or both of the waist line to keep the elastic from rolling.

walla, there you have it, instant shorts.  This took me about 30 minutes.


happy boy!

bootie shot
If you make these, let me know how it goes!!  Enjoy!

Thursday, March 8, 2012

Bandanna dress for a little girl:)

I have been wanting to do this for a long while... finally I was able to get it done.  I had made this for my adorable 1 year old niece, but after trying it on my sweet friends cute little 6 month old.... I'm pretty sure it would be to small!! lol SO, Alison ( the cute baby in the pics) gets to keep this one and I will make another one soon with two bandanna's instead of one!  I LOVE the colors of this bandanna!!  For this all I did was use some elastic thread for the bobbin, hand winding it tight and then sewed a bunch of lines... I think 6 or eight.  I cut some of the top off so I could use that later for some quick halter type straps.  EASY as PIE!!  I know, I should make bloomers... but they took alittle more time then I had at the time, so, next time!  Anywho, give it a try!!


Ya, I just LOVE this bandana!

Friday, January 27, 2012

I just made my new FAVORITE head covering!

Ok, so I feel like I'm on to something here.  First of all, let me say I love bandanna's!  They are pre-cut, ready to go square-ish things that come in a TON of different colors and patterns!  They are PERFECT for a head covering... only thing is, I don't really like the normal way to wear them.  Put them in a triangle and tie them in the back... it's just not my favorite.  Not.... as cute as I want it to be:)  SO, I have come up with what I think is a really great way to make a bandanna into a CUTE snood head covering that is comfy, stays on your head, holds all your hair and can be worn a few different ways!!  Check it out!
So here is a back shot. I just love how full this is and how it falls in the back! 
This is the first one I made a week or so ago. I used some directions from online. It turned out good, but I like the new version that I came up with that is longer and the headband goes further around the head on the new one as well.
This is another way you can tie it:)
Or you can tie it and then tuck the tie under into the back:)
Thanks to my beautiful model Sammy for helping me out with these pics:) She loves pink!

Thursday, January 26, 2012

Making Jeans into a SKIRT!

So, I have finally done something that I have wanted to do for years!!! I made some SKIRTS made out of JEANS!!! YEAH!! My friend Kate wanted a skirt made out of her jeans and so we set the date to create! The day before she came I decided to give it a try so I could do a better job on her precious jeans! So, this first skirt is actually the one created for her from her jeans...(we just happen to be the same size by my surprise:).

She wanted her jean skirt to be ALL jean, so we cut the legs off of another matching colored pair, cut it up the seam and turned it upside down so the wider part of the jeans(the thigh part) was at the bottom of the skirt. Then pin and sew:) We added a decorative trim ribbon at the very bottom.


She had a whole in the front of the jeans so she took the pocket from the jeans that we used for the triangle patches and put it on the front, what a perfect touch!

This is the skirt I made for myself the day before. I used a pretty dark blue fabric this time. It happened to be in almost perfect rectangles already so I just pinned and sewed and hemmed it at the bottom. SO comfy, long and warm and modest:) YEAH:)


I had enough extra fabric leftover to make a matching headcoving...yes... I kinda dig matchy matchy stuff:)


So, does everyone want to make one of these skirts now!!! You can do it!!! Very awesome:)

LinkWithin

Related Posts with Thumbnails