

This has been a long time coming but it's finally here! I found a bit of time to do a thorough tutorial of my yarn wrapped bracelets. I made a few modifications so they are more durable. Hope you enjoy!
Ok, so this is what you will need:
Yarn ( the changing color kind is my favorite!), large needle, ruler, toilet or paper towel roll, wide clear tape or contact paper, sharpie, scissors, cross stitch string, hot glue!

First, cut off a piece of the roll. Whatever size bracelet/bangle you like!

Here's mine...

Now cut it so it can lay flat like this.

Mine looked alittle wonkie on one side, if yours does, just eyeball trim it.

This is my quick quick solution for the edges. They will be slightly visible when the bracelet is done, so I decided to pick a coordinating sharpie and use that to color the ends. Make sure you do the very thin top, bottom and side edges. If you like, you can easily use a small piece of fabric here with hot glue or , I think it's called basting...something like that. Anyway, you can use something like that here if you like:) This idea is just way cheap and easy:)

Both edges finished

Now roll out some clear wide tape and stick it on there. I gave it around an inch extra on both sides. I am doing this because my daughters wore some previous ones that I made and got them completley soaked. They ofcourse being made out of paper ripped and got ruined. SO, this is my way to make them more durable/water proof!

Now cut the tape off...

flip over the edge tight...

flip over the other edge tightly

Flip over the top long side. I kinda rolled the tub on top of the edge to make it more even.

Then do the other side.

Now do the same thing to the other side of the tube so that both sides are sealed..

Like this!

Now put a thin strip of hot glue across the edge on one side, just over from the edge, not right on it.

Smoosh the end of your yarn on the edge.

For extra security, I put another drop of hot glue on the top front side and wrapped the yarn tight together over it. I think I would do this on the back next time. Just to try to keep an possible glue sepidge on the back of the bracelet. DON'T wrap the yarn to tight, or your will crimp your roll!!

These three wraps got glued down.

Now just keep going. I love how the yarn changes color through this!!

Half way there! At this point you can add a cute bead or charm. You can actually add beads and charms throughout if you like!! Make it your own!

Now were at the end. I put a small strip of hot glue on the front at the end, then smush the yarn on it. Then flip over and do another strip of glue, smush, and cut off the end. ( sorry, don't know what happened to the backside pic!?)

So you should have something like this now.

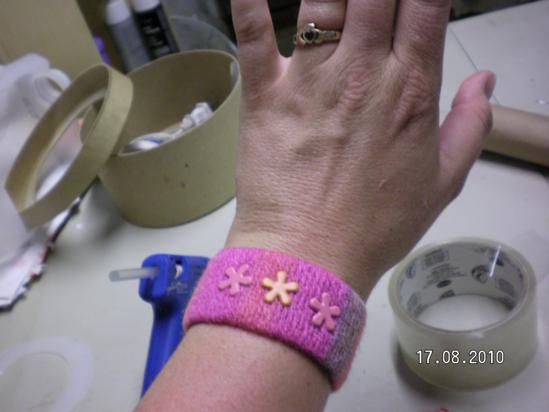
Now you can, if you want, add some cute brads. I had some cute scrapbook brads so I added a few of those. Just eyeball the middle and poke your hole.

Stick the brad through...

I added a few to the sides...

Now you should have the end of the brads sticking out like this.

flatten out the brads against the roll, NOT the yarn.

re-smoosh the yarn to cover the brads!! See, invisible!!!

Now cut some cross stitch string...or maybe it's called embroidery floss??

Going from the bottom, sew through the end of the bracelet.

Bead on your button.

Sew through the other side of the button. This one has two holes, if you have more, sew through those as well.

I came back and sewed through both sides again for a more secure button.

Now the button should be on tight and you have to now Tie, double knot, the ends.

Cut most of the excess and tuck the rest under. I should have done this better, It doesn't have to be seen at all if you do it right.

like this.

Now cut another piece of floss. I cute this alittle shortish, I would do around atleast 10 inches next time.

Sew from underneath up through the bracelet. I would sew this closer to the middle next time.Then come back through the top.

Tie these as close to the ends as you can.

Cut a bit off if you need to and tuck the rest under the yarn.

So this should be around what the inside of your bracelet looks like.

And this should be the front!

Now to put it on! OH YES, if made properly, pretty easy to put on with one hand!

Wrap string around the button. I now we have made a loop with the string, but wrapping it makes it fit anybodys wrist and keeps the bracelet on quite securely!

And there it is!! Go make your own and please come back with pictures of your creations!
Ribbon wrap plastic bottle bracelets next!
No comments:
Post a Comment