Pages

Showing posts with label Homemade Recipes. Show all posts

Sunday, March 4, 2012

Easy WONDERFUL Whole Wheat Bread!

After many attempts with different recipes, store bought whole wheat verses home ground wheat etc.... I have finally found the recipe that all of my family LOVES!!! This bread is SOFT and STRETCHY and CHEWY and WONDERFUL!!! Here are some pics of the beautiful loaf. Below them I will share the recipe. I make this in a bread maker on the dough setting and then bake it in the oven:) All credit for the perfection of this loafs goes to my friend Jeni. She hooked me up with home ground wheat ( which makes a HUGE HUGE difference) and helped me with some recipe malfunctions!! THANKS JENI! Take a look at it in all it's glory!
Happy customer:)
This one is getting way close to my bread... I mean... our bread...right...ours...
Ok, I guess we should love our bread, but not LOVE our bread!    LOL
A close up of me and loafy:)
YES we get excited about bread around here! So here's the skinny on the recipe. This is for a bread machine that makes 2lb loaves... I have a Long loaf pan, so I make one loaf, if you have a standard one you can make one loaf and some hot dog buns... hamburger buns... rolls... etc..
Basic FABULOUS whole wheat bread
1 1/2 cups WARM water
2 tbsp powdered milk
4 tbsp ( which is 1/4 cup) honey 1 1/2 tsp salt 2 tbsp coconut oil ( I use this in place of shortening now, but you can use olive oil just the same, coconut oil is SO good for you...but that is for another post:)
1 HEAPING tbsp vital wheat gluten (so important, you can get it at wal mart, makes soft stretch wheat bread!!!)
4 1/4 cups Freshly Ground Whole Wheat Flour ( now, I do replace that 1/4 cup of wheat with flax seed often because flax seed is so SO good for you and helps with fiber, which cancels out some carbs for us diabetics. That is the tiny brown specs you see in the pics above, you can NOT taste it, but it's there:)
Put it in your bread machine in that order and run it on the DOUGH cycle, which for mine takes 2 hours.
Then, I plop it out on a floured board, shape it to fit my long loaf pan ( or use a regular size one and make some rolls etc.. with the extra, I would use 2/3's of the dough for a regular size loaf pan, you can use it all, but it will be a TALL loaf:)
Then, spray your loaf pan WELL and place your dough in it. I cut some very shallow slits diagonal on the top of mine... maybe there's some real reasoning for that, but mostly I just think it looks pretty:)
Then, I place my loaf pan DIRECTLY in the oven and turn the light on.
I put the oven on warm for 1 MINUTE!! JUST ONE!! SET THE TIMER, YES, EVEN FOR JUST ONE MINUTE! I have lost many a loaf to forgetting to turn it off quick enough. The bread will get a bit of a hard crust on top and will keep it from rising anymore.... and at that point.... we have french toast sticks for breakfast!! LOL
Let the dough rise for at least 1 hour. I set the stove timer.
Then, I turn on the oven to 350 and bake it for 25 minutes or so. Doing it this way helps you from accidentaly hitting the pan or having to move it and then having the loaf fall on you....so sad when that happens:( There is a STRICT no running or jumping policy in the kitchen during that time, see why below:)
This COULD happen to your bread too.... NO BOUNCING in the kitchen! :)

Take it out, BASK in the glory of your beautiful loaf.... then humbly thank the LORD for your awesome bread:)
I let mine sit for 5 minutes to cool a bit then take it out and put it on a cooling rack till it completely cools.
DO NOT put it in a plastic bag till it's all the way cool, unless you want soggy bread.....
Bread making is so much fun and alot easier then some think, if you got a good recipe, a trusty bread machine and simple oven, YOUR IN BUSINESS!!
Blessings!

Sunday, January 29, 2012

Make your own "fortune"/ verse cookies!


     I get some blogs in my email with great idea's for crafting and cooking.  Gail over at CAN'T STOP MAKING THINGS has a really fun looking recipe for "fortune" cookies.  NOW, I'm not a big fan of the "fortune" part, BUT, I think I have a neat idea to still make these cookies fun without the fortune part...  Bible verses!!!  You can print out small slips of paper with really encouraging bible verses on them, maybe verses that speak of God's promises, or the ones that remind us who we are in Christ, and slip those in for a great little surprise treat for your friends!!  These look really easy to make and adaptable for those with allergies or restrictions.  I will probably make these with splenda and soy/coconut or almond flour to keep the carb count down for my diabetes:)  Hope you give these a try, just go to CAN'T STOP MAKING THINGS to get the recipe with good pictures too!

Tuesday, January 17, 2012

Cooking LOTS of chicken


     A few days ago I decided to cook a bunch of chicken and when I was all done I decided this might be a good thing to share on the blog! 
     A few months back there was this GREAT sale on chicken leg quarters (where the leg and thigh are still attached to each other).  They were selling this 10 lb. bag of chicken leg quarters for... I think it was  maybe 69 cents a pound!! CHEAP!  So I bought it thinking I would cook it someday I had time.  Well a few days ago I finally did!
     The first thing I did was rinse and dry all the chicken.  Then I put them all on foiled lined and oil sprayed cookie sheets ( easier clean up).  After that I salted and peppered both sides of each leg and then roasted them for around 50m to 1hr. at 350 degrees.  When they were all done we each had one for dinner with some peas and potatoes!! :)  But after that, I took all the skin and bones and put them in a stock pot and put all the chicken in another bowl ( I pulled it apart as I went so I didn't have to chop it up later).  I covered the bones and skin with water ( DON'T FORGET to add 1-2 tablespoons of vinegar, it gets the really good gelatiny stuff out of the bones) and let them boil for a very long time, ( I would normally do this in a crock pot up to 24 hours, then to the stock pot to condense the broth, but there was to many bones etc. to fit in my big crock this time!)  I let it boil/simmer for a long while, then I strained out the big bones and stuff into another bowl, then I used a even finer strainer one more time for some of the tiny stuff.  I put that bowl in the fridge over night so the fat would rise and somewhat harden.  This makes it easier to remove in my opinion.  What is left over is this rich almost gelatin chicken broth full of nutritional goodness!!!
     After you've got all the fat scraped off, ladle this into the smaller sized freezer ziplock bags ( don't forget to label the bags first, much easier this way:).   I used four cups for each bag.  You can push the bag down into a cup to make it easier to fill if your doing this alone.  Then I put them on a cookie sheet and froze them in the deep freeze.  And there you have it, homemade chicken broth!
     Then as you can see above, I separated out the chicken into 6 two cup bags and froze them too!!  Now I have some great items ready to make my life easier for meal for the next few weeks!  I have already done chicken noodle soup!  I used left over noodles from last nights dinner that I just put in a ziplock with alittle olive oil to keep them from gumming up.  Then I added a can of green beans, some pre-cut carrots that I froze this fall,  my broth and chicken alittle salt and pepper!  Instant YUMO!!  Hope you give this a try, it's been a blessing for this house!!


Thursday, July 1, 2010

Recycled wood to furniture craft tutorial PART 2

Alrighty then...8 boxes later I have finally finished...mostly:) Here's how I did it:

First I picked out a main color and a accent color for all the boxes. The main color got painted on the inside and the accent is on the front outside trim and the back. Here's a pic of one of them finished with painting... (oh ya, and I want to give a shout out to my friend Jeni who helped me and showed me how to do all this!! YOU ROCK!)

Now you need to pic your paper. I had alot of scrapbook paper that I haven't had time to use in years so I pulled that out. I tried to match the paper mostly to the colors I painted. You can use one pattern or two, three...whatever you like. You can also use magazines newspapers etc...decoupage is one of my new favorit things!! SO much fun!

Now you need a paint brush, some water and some decoupage glue. Now being the thrifty lady I am, after I ran out of this rather expensive tiny tub of true decoupage glue, I searched the internet for homemade stuff. I found one recipe that calls for equal parts elmers glue and water. I made it and used it for the rest of the boxes and worked out just fine!! YEAH!!!

Now I tore the paper up in pieces. I saved the corners and strait pieces and put them in seperate piles to use on the strait sides of the boxes.

Next you need to put glue down on the surface where you want to place your paper. Don't be to stingy here or you will get bubbley paper later!

Then place your piece. I like to put one finger inthe middle and then use the brush and paint the glue from the middle out all the way around and finish in the middle.

Then just keep going around your piece in a patter ( or not, up to you) until you finish. I like the overlap look here. I finished the middle with the pieces that were neither corners nore strait edged.

Here is one finished side that needs to dry. Isn't this so coooool and easy!!!

After waiting overnight, I finished the other two sides.

Now here are some quick pictures of all the others. I will set them up properly and take better pictures later.


Now here is the HUGE pile of stuff, the majority of which must fit in this adorable boxes!! This pile has been haunting me for weeks so I am SO happy to get started organizing the curriculum into each box!

Now there is one thing I must mention. The RIGHT way to do this decoupage stuff is to do a bunch more layers of glue or spray clear spray paint sealer on them..... Ummm.....I'm incredibley inpatient and want to get everything cleaned up and organized now!!...um, so the correct way is to seal these bad boys... I may or may not this time around. Might seal them next time I move them around. But that's just me, I would recommend finishing them now so they are sealed and nice and don't rip etc.... Hope you enjoyed the tutorial!! Now time for some Forth of July crafts!

Monday, January 25, 2010

Sandwich Puzzles!

Something fun, quick and easy to do with the kids is make them a Puzzle Sandwich! This makes lunch just that much more special and FUN! Take a look:

Make a yummy sandwich!

Pic your favorite cookie cutter and go for it! ( I used a Pampered Chef tool I received from my sista's in Christ!)

Cut the rest of the sandwich into different size pieces, easier or harder according to age:)

Place on the plate all mixed up!

Have fun watching them work the puzzle ( and lick there fingers!)


Happy kiddos!

Friday, January 15, 2010

Johnny Cakes!!


Our Newest activity on the trail was to make Johnny Cakes! This is a recipe they would have used on the journey ( we used the buttermilk from the butter we made as well as the butter for on top!), probably when they ran low on flour or for something different. They could have bartered for corn from the Native Americans along the way. Here's some pictures of how it went. The Verdict: Not my favorite, but Sammy LOVES them and Kay thinks there ok. If I were a grits girl I'm sure I would like them, but it's the texture that does them in for me. Not horrible, but I'll take flour over corn meal for my cakes!! :) For fun, we did one on the wood stove and the girls had it for part of there lunch:)
BENJAMIN UPDATE:
Ben has a doc appointment on Monday to find out what to do about the sist. Will continue to update as I know more!

Wednesday, January 13, 2010

HOMEMADE BUTTER!

Time for some good old fashion butter making!!! FIRST: Take some heaving whipping cream and fill and small container ( we used small baby food jars) half way full. Screw the lid on TIGHT!


SECOND: SHAKE! SHAKE! SHAKE!


NOW: You should have a jar with a nice lump of butter that's surrounded by BUTTERMILK!!

THIRD: Take that yummy buttermilk and strain it into another jar.

THEN: Plop out your butter in a small bowl, add a bit of salt ( around a pinch to an 1/8th tsp.) and WALLA!! BUTTER!! Spread on something yummy and consume!!

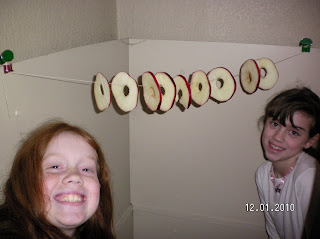
Finally dried apple rings!!


Well, after a little more then 24 hours, they are finally nice and gnarly looking! lol They are chewy and sweet and tangy!! YUM YUM!! Gotta try this!

Tuesday, January 12, 2010

Dried Fruit


Today is kinda a slow day. Normal school things in the morning. Jason took the truck in AGAIN to see what the deal is. Of course it didn't do whatever it's doing wrong while they had it though. But, asked him to bring it in as soon as it does to look it over free of charge. So that's good! Today our history activity is dried apples. SOoooo, daddy went to the store for a big old Jonathan apple and we got to slicing. We made as many rounds as we could ( after coring ), dipped them in lemon juice and then strung them up on a bit of string behind (what I think ) will be the perfect dehydrator... and closer to what they had back then as apposed to a electric one:) We will see how it does. Drying time depends on temp and thickness/size of the apple. Will let y'all know how they turn out!!

Monday, January 11, 2010

Monday HOMEMADE FUN! Candles, Mayo and Bread!


A new week brings new adventure here at the Land house! Today we have had lots of fun creating homemade items! First project of the days was making beeswax candles! So easy and fun to do! The girls really enjoyed making there own candles and then adding little bits of wax shapes here and there to make it there own. Sammy got to add a beeeeee! Jason got to make one too with the bit of left over wax. I can't tell you how wonderful it is to be able to have him participate with us. We all really love having daddy around!
Next up was lunch! We found a really great recipe for HOMEMADE MAYO! So, we used that with our homemade whole wheat bread to make tuna sandwiches! The mayo came out so great, I don't think I will ever go back!! Here's the recipe ( I got this from a blog I follow called "The Grocery Cart Challenge":

Homemade Mayo

1 whole egg
1/2 teaspoon dry mustard
1/2 teaspoon salt
2 tablespoons white vinegar
1 cup canola oil
1 dash paprika

*Recipe makes 1-1/4 cups mayonnaise.

In blender, add egg, dry mustard, vinegar, paprika and 1/4 cup oil and blend on low 1-2 minutes.
Turn blender off, and scrape sides down. Turn blender on, and while it is running, slowly add the remaining 3/4 cups oil. Blend until the consistency of mayonnaise. Refrigerate in non-reactive container.


We finished Lunch off with some funny face plates and some "Mock wine" ( kooooolaid!) and had a elegant candlelight lunch! Hope ya'll are having fun too! Mondays don't have to be horrible if you throw in a little fun!


LinkWithin

Related Posts with Thumbnails